Sunday, March 31, 2013

Fresh Avocado Summer Rolls

It is finally starting to feel at least a little like spring around here, and my pale, mildly cranky (with the weather) vitamin D deficient self is beyond excited about it. Part of what I'm excited about is getting a little more fresh produce- I am pretty sure I was not properly appreciative of California's constant abundance of fresh delicious fruit while I was there.

Anyhow, lately all I want to eat are things involving cold veggies- salads, sandwiches, and now... summer rolls! I got this idea in my head and had to make it happen immediately. The first challenge was finding the proper wrappers. At the first store, all they had were frozen spring roll wrappers. I bought them, however, after immediately panicking and googling it with my phone on the sidewalk, I determined that they were the wrong thing and are really meant for fried/baked spring rolls. What you actually want are rice paper wrappers. They are dry and should be on the shelf in the Asian section. These are the ones I got, but there are apparently many brands:
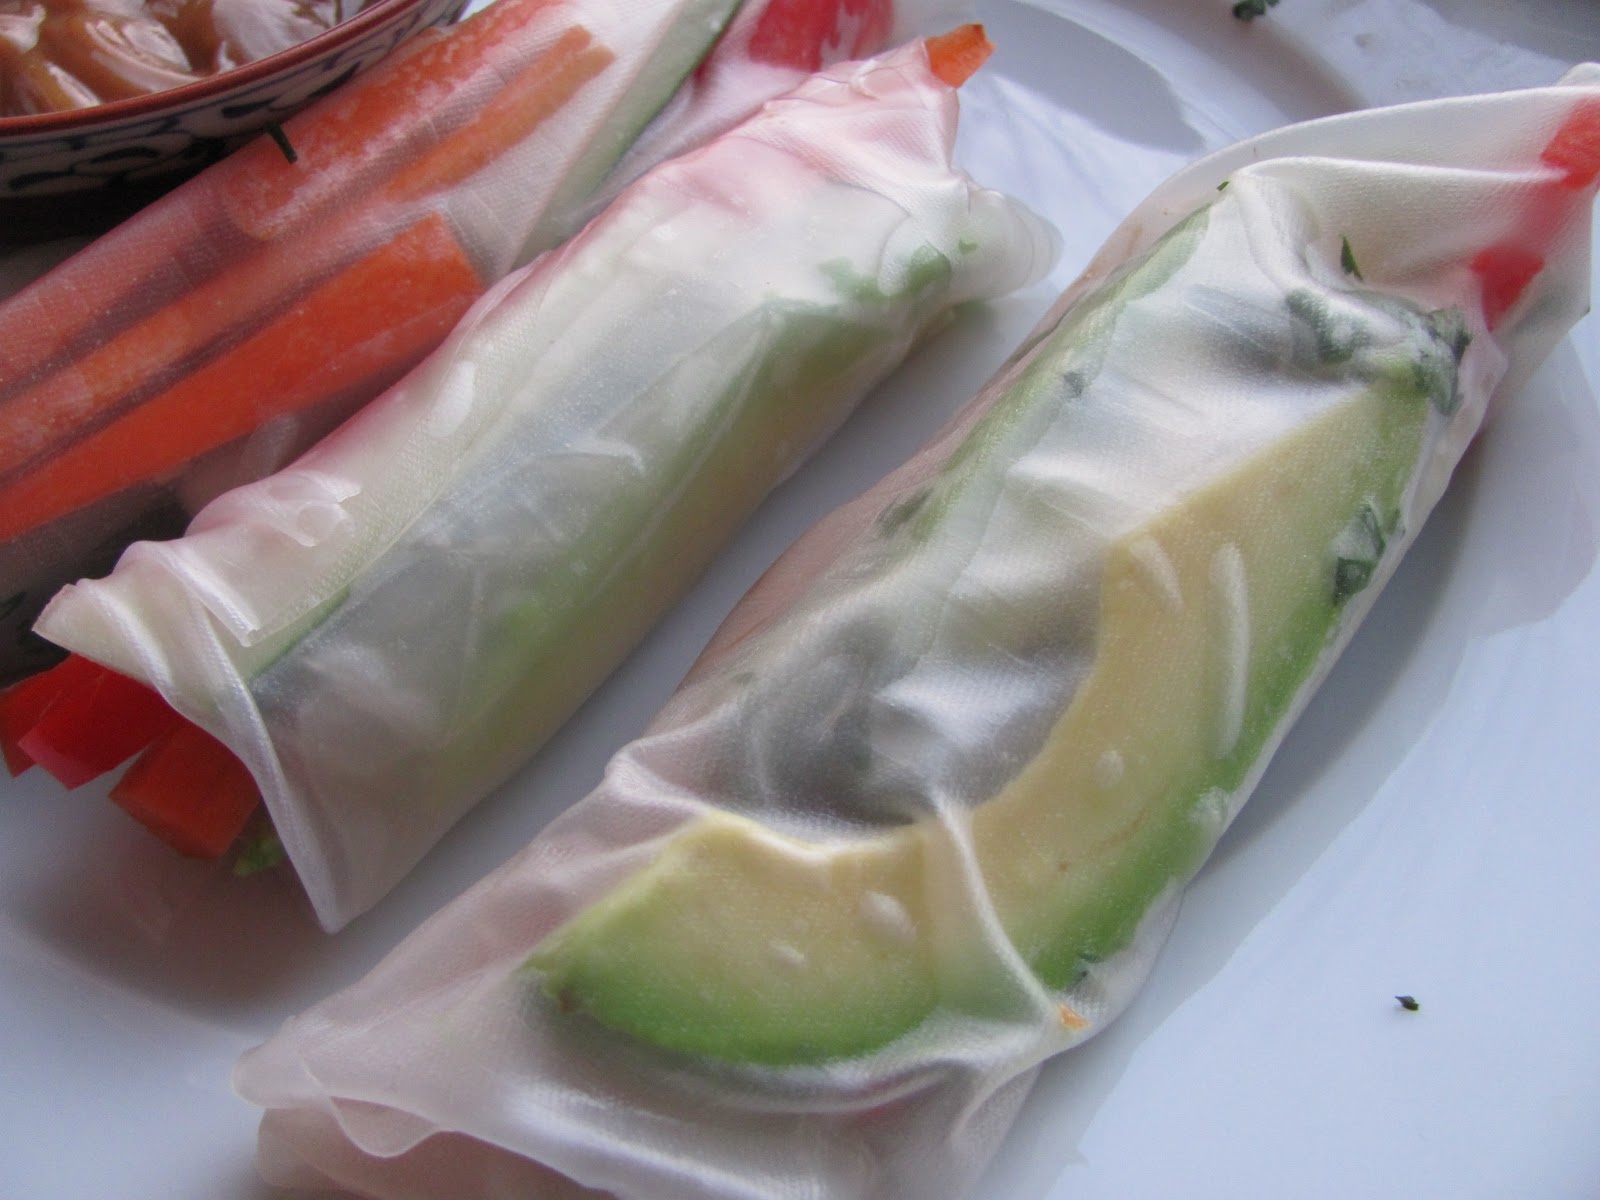
You can put almost anything you want in there. Your favorite veggies, chicken, shrimp, tofu- whatever! Anything you can put into long thin slices. I chose cucumber, red pepper, carrots, and instead of one of the protein choices, used avocado. You'll also want some type of herb- mint/cilantro/basil- I used cilantro. The important thing is to chop it all up ahead of time because you're going to need to move quickly.
Now- the rice paper will be very dry and stiff when you take it out of the package. I filled an 8x8 pyrex pan with warm water. Submerge a sheet until it is soft (not tooooooooooo soft, or it'll break. it'll also keep getting softer so if it feels a tad bid stiffer than you'd like when you first take it out, that's ok). I had a variety of badly shaped rolls, but when making the most successful ones, I  just immediately folded the rice paper in half, put the filling in the middle, then rolled it around the veggies as tightly as possible. I'm not going to lie, it was kind of hard to get it tight. I'm imagining it is similar to attempting to role nice looking sushi. They were all edible, but the half sized ones were definitely the most sturdy.
You could dip this in any variety of sauces, but I decided to make a simple peanut sauce (because I can't resist a peanut sauce). I used 3 tbsp peanut butter, 3 tbsp seasoned rice vinegar, 1 tbsp soy sauce, 1/2 tbsp sesame oil, and a squirt of sriracha (if you use regular natural peanut butter add a dab of honey. if you use peanut butter with sugar in it, then don't). This made a lot of sauce- definitely enough for two people.
(I wanted to cut a roll in half to take a lovely picture, but was afraid my rookie-rolls would fall apart, and it was my dinner, so I had a big interest in being able to eat it). 

The combination of the peanut sauce and the crunchy veggies and the creamy avocado- SO GOOD! I can definitely imagine these being a staple in the summer when it's hot out and the idea of turning on the stove or oven is overwhelming. They were really fresh and good- try it!

Thursday, March 28, 2013

Cheater 'Eggs in Purgatory': Seriously, it Does Not Get Easier Than This!

You may remember this shakshuka (aka Eggs in Purgatory) from a few weeks ago:


It was delicious, and pretty easy, but it did involve some amount of chopping and having the right veggies on hand. I have now discovered a miraculous short cut that will change this from 'delicious brunch item' to 'emergency weeknight dinner'. What is this magical ingredient, you ask?

I bought this by accident, and it is now going on my grocery list forever. Here is what I did in version 2:
1. dump can of tomatoes in non-stick pan along with 1/4c water
2. sprinkle with smoked paprika (which is soooooo good) if you have it, or else cayenne. and salt.
3. cook tomatoes until they turn from bright red to darker, stirring periodically
4. make 2 holes, crack in 2 eggs.
5. cover pan and cook until egg whites are firm
(optional- grate some cheese on top)
6. Eat.

2 ingredients, 15 minutes, healthy dinner... this is what weeknight staples are made of!

Sunday, March 24, 2013

Chickpea Avocado Sandwiches... nomnomnom

This is one of these recipes that I have been looking forward to making, and now that I did I can't imagine what I was waiting for. Behold, smashed chickpea and avocado sandwiches, from Two Peas And Their Pod. Basically, this is a really good (vegan) alternative to other salady sandwiches, and even if you don't care about the vegan-ness, the lack of mayo is definitely a plus for a lot of reasons.

This is all you need- a ripe avocado, a can of garbanzo beans, chopped garlic, salt, pepper, juice of half a lemon/lime. Now, you're going to want to rinse and drain the beans really well. I also tried to rub them around between two paper towels, and get as many of the skins off as possible (similarly to when I roasted them).

Now, just mash it all together! You want a variety of sizes of bean pieces.

That is basically all there is to it- just fix it up with your sandwich additions of choice (here, arugula and red pepper strips). If you want to save the rest of it, just squeeze the rest of the lemon on it and it should keep the avocado from oxidizing.

I really liked it, I'm sure I'm going to make this again!

Tuesday, March 19, 2013

Instagram... woo!

Ok, so I think we can categorize my entire Twitter experience as a complete failure. Well, not really, because I still like to read other people's tweets, mainly when I'm bored and waiting somewhere and wanting my phone to entertain me. But, I'm just not the tweeting kind.

So, you'll notice that the top of the page the twitter tab is now gone forever (no big loss), and has been replaced by Instagram. Because, I may not be able to keep up with tweeting, but what I CAN do is take a million picture of my dinner and my cat, so instead of fighting it, I'm just going to go with my strengths!

Monday, March 18, 2013

Savory French Toast- A New Spin on Brunch


This weekend I had bread, eggs, and avocado, and found myself trying to think of something to make. Of course, there is always scrambled eggs and toast, but I wanted something a little different. I finally landed on some form of French toast, and this is what I got!

First, to make French toast, you basically take 2 eggs, beat them well, and if you have it (and, it's better this way) put in a little of whatever type of milk you have on hand. You could definitely use only egg whites, just use a bit more so the volume is the same. Then, soak the bread. Be sure to move it around so all the parts of both sides are in the egg mixture for a while. When the egg is all soaked up, you're ready to cook! If this was sweet French toast I'd sprinkle with cinnamon, but instead I sprinkled with salt and pepper.

Now, you heat a griddle, or a good sized frying pan, and spread around your butter product of choice (I used Earth Balance). I don't really think cooking spray is going to work here. Drop the bread on the pan, and cook until the bottom is brown, then flip. You want it to be brown on each side, but you don't want to cook it longer than you need to or else it'll be dry.

Now... the toppings!
I went with a trio of toppings.... 1. smashed avocado (yes, that is like half an avocado, I didn't want to waste it! as a side note, in order to preserve the other half the avocado, rub a lime or lemon wedge all over the cut surface and it won't turn brown) 2. salsa 3. cheezy mixture- mine was a wedge of laughing cow cheese smushed up with a little salsa. you could also use cottage cheese, or ricotta, or cream cheese- any soft cheese to add some creaminess. Since there is no syrup, you want to be sure you have enough topping to make it all moist.

This was slightly weird, but really pretty good- it was definitely a nice change of pace from the usual scramble I always make, and it definitely highlighted the avocado (mmmmmmmm avocado. when I was a child, I was afraid of avocado and refused to eat it- I now refer to those as 'the lost years'.). 

If you were having a brunch, you could even make the base French toast recipe, and then provide different toppings (sweet vs savory) for people to choose from. If you're going to make a lot of French toast, I'd stick with the 1 egg/bread piece, but you can soak more pieces in a 9x13 pan.

Give it a try!

Sunday, March 10, 2013

Easy Decorating Idea: Colorful Framed Paper


I got this really easy decorating idea from Pinterest (as usual). Unfortunately, (also as usual) someone didn't pin it carefully, so it isn't possible to track down the originator of the picture and cite them here (I also can't get the embedded pin to center itself- ah well).


Having just recently wrapped up the painting of the dresser, I've been thinking about the state of my bedroom. It was fine, but there was kind of a lack of coziness, I think because of all the white wall. I have tall ceilings, which I love, but it does mean there is a whole lotta wall to cover! Here it is, before:
Meh.

I went to Michael's to see what there was to see, and it turned out they were having a sale. I found the frames I used for 5 bucks each- I wasn't really willing to risk too much, because for all I knew this was going to look ridiculous. My criteria were: black, relatively thick frame, and the mat had to be included. 

Michaels also has a large paper selection, which is good, because picking out the paper was pretty challenging, actually. I noticed the original picture had a mix of sizes of patterns and colors. It also had to match my quilt. I tried to pick patterns that had some unique and some repeating colors so that every color was in at least one other panel. Fortunately, paper is pretty cheap (usually about 50 cents per sheet, but today 6 for $1, can't beat that!). So, I bought a bunch of extra just in case. The other perk here is that you can always switch up the colors later if you want a new look.

Be sure to clean the glass in the frames before putting the paper in. also, for geometric patterns, really make sure it's straight or else it'll look sloppy. (It was really hard to take these pictures without glare obscuring the patterns).


Other than picking the paper, the next hardest thing was clearly hanging them evenly spaced along the wall. Really, I don't have any magic solution for this, it involved a lot of measuring and remeasuring and making teeny dots on the wall and then doing math on my hand and swearing while I stood on the bed. But finally, I got them up!

Overall, I'm pretty excited about it! It didn't take that long, it brightened things up, and things look a lot cozier!


Sunday, March 3, 2013

A few new things in the shop!

Well, the title pretty much says it all...

First up, this little fish, which I realized is yellow and I should probably keep for myself as my mascot, but for now, it's up there!

Then there is this necklace, which I actually made out of old watch pieces that I bought when I was making my Steampunk Butler Munny

And finally a new version of my teardrop line of earrings, but instead of beads, made with more little gears

There are a few more....go on over and check it out!

LinkWithin

Related Posts with Thumbnails