Saturday, June 30, 2012

Quick Summer Dinner- Grilled Peach Salad

This is barely a recipe, but it was so tasty and quick I figure I'll throw it out there. Last summer I fell in love with grilled peaches. So, the first time I saw some nice peaches in the store, of course that's what I immediately thought of.

This is as easy as it gets... I grilled a Trader Joes Kobe-style burger I had around, threw a peach on at the same time, and served the whole thing with arugula, gorgonzola, and a few toasted walnuts, all drizzled with balsamic vinegar. For a 10 minute meal it absolutely hit the spot!

Saturday, June 23, 2012

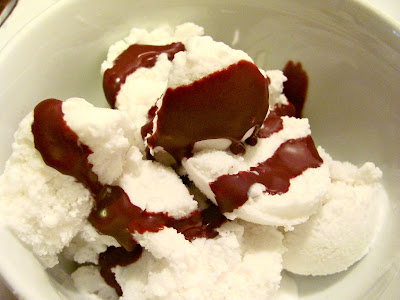
Coconut Sorbet and Homemade Magic Shell (Vegan!)

Imagine the magic of a childhood treat... cold refreshing ice cream with a crunchy shell that you have to  crash through with your spoon to take a bite. Ahhhhhh.... Magic Shell! 

Now, somehow my adult self has avoided Magic Shell just because it seemed like there was no way something like that didn't have a million scary and bizarre ingredients. Then thanks to my good friend Pinterest, I found out you can make it yourself, at home, with only 2 simple ingredients.

Honestly, I'm not sure I am prepared to wield that kind of power.


But, now that I know this amazing secret for myself, who am I to keep it from you. So, here it is.

The pin I found for the topping was from the blog AlphaMom, and it looks like there is plenty of other good stuff to be found over there. But, first, I'm going to fill you in on the sorbet itself, because it's pretty amazingly simple as well.

Sorbet- what you need:
2 cans coconut milk (I used 1 whole fat and 1 light)
1/2 c shredded coconut
1/8 c sweetener (sugar or agave)

What to do with it:
Hang onto your hats, this is pretty complicated. Dump all the above ingredients into your trusty ice cream maker. Push "go". When it seems to be pretty well frozen, scoop it out and put it in the freezer in a tupperware. That's it!

"Magic Shell"- what you need:
1 1/4 c chocolate chips (if you want this to be vegan, then do your due diligence on your chip selection)
1/2 c coconut oil

What to do with it:
This is also VERY VERY COMPLICATED. Put the chips and oil together in a bowl in the microwave, and run for 1 minute or so until it's melted. Let it sit a minute then stir until totally combined. It's pretty runny at this point, but when you pour it over the ice cream it'll freeze right up!


This whole thing is kind of genius... basically, it's all capitalizing on the fact that coconut has a really interesting melting point (around 76 degrees). So, it you warm this up just a bit, it's melted, but as soon as it cools, it solidifies. You can keep it in the fridge and then warm it up a bit so you can pour some off to serve.

Overall, the coconut sorbet itself isn't too sweet, which makes it kind of nice and refreshing- plus, it's rich enough from the coconut milk to seem decadent without needing a lot of sugar. And seriously, there is something about whacking the chocolate sauce with the spoon that's just fun, that's all there is too it.


Thursday, June 21, 2012

A Sweet Side Dish- Banana Curry

Sometimes I run across a recipe for something and I just know that I have to make it immediately... banana curry was one of those things. It just sounds so WEIRD, you know? 

Well, it was a little bit weird, but it was also a really unique side dish, and I think the sweetness makes it an especially great side for something spicy. 

(You may note I'm not giving you the recipe for the chicken, and that's 
because basically it was ok but nothing particularly special).

This recipe came from Manjula's Kitchen, my go-to source for Indian food. 

What you need:
3 bananas, sliced into pretty thick slices (you don't want them to just turn into mush)
1 tbsp vegetable oil (coconut oil might have also been good)
1/2 tsp whole cumin seeds
1/8 tsp asafetida (hing) (if you don't have this, you could add a little bit of garlic)
1 minced jalapeño (if it's a big one, just use half)
1/8 tsp tumeric
1-2 tsp chopped ginger
1/2 tsp salt
1/2 tsp brown sugar (or mango powder if you have it)
a little water (~2 tbsp)
chopped cilantro, 2-4 tbsp

What to do with it:
(Note: this all comes together really quickly so have everything ready)
Heat up the oil, and when it's hot put in the seeds until they start popping, at that point add the asafetida, turmeric, and jalapeño. Stir it around, then put in the banana, ginger, sugar and water and stir really gently. Don't cook too long, just enough to quickly cook the bananas through, then remove from heat, sprinkle with salt, and gently stir in cilantro. And... that's it!

Even if you're not a meat eater, I think this would be pretty sweet and light for a main course (I mean, there is pretty much no protein), but it's great as a side dish and it's so quick together it's definitely worth a try!

Monday, June 18, 2012

A Battle of Wills


Charlotte is on antibiotics. This has proven to be a challenge for both of us. For me the challenge is trying to wrestle a writhing cat to the ground, for her the challenge is to avoid medical care at any cost. I have created a handy little graphic in case you end up in this situation yourself. The most remarkable thing is the change between Days 1 and 2- who knew she could learn so quickly! (Disclosure, the full week is based on the last experience, this time we went through Days 1, 2, & 3 at which point I started hiding it in some Fancy Feast)


She looks, so innocent, right? I'm here to tell you, it's all an act.

Saturday, June 9, 2012

We made cheese.... yes! CHEESE!!!

To me, cheese is a kind of magical substance that appears at the store and seems way beyond the capacity of any normal, modern, non farming, person to make unsupervised.

Oh, I was wrong! Not only can you make it, you can make it in 30 minutes!

It turns out, to make delicious mozzarella cheese, this is all you need:
- A gallon of whole milk
- citric acid
- rennet (I got liquid vegetarian rennet, because real rennet kind of grosses me out)
- salt

I got all of this at whole foods for a reasonable price (although I had to ask for help finding stuff), and I have enough rennet and citric acid for many many more batches.

So- what do you do? Turns out most of it is pretty simple.

Combine 1.5 tsp citric acid with 1/4c water. Also combine (separately) 1/4tsp rennet with 1/4c water. Pour the milk in a large pot and slowly (this will require only low heat) bring it up to 55 degrees - as a warning, this is really not very hot at all so be sure you're taking the temperature as soon as you start heating. Once it hits 55 (Fahrenheit), pour in the citric acid and keep heating. When it hits 85, put in the rennet. Continue to heat, but stir very very gently and only occasionally- you want the curds to be able to form. 

Keep heating (to around 95-105) and pretty soon, the milk will start to seem clumpy and thick, and separate from the side of the pan.
When this happens, stop heating it, and just let the curds sit there for about 5 minutes or so, so they can separate from the whey in peace.

Now, this next part was actually the hardest for me- you want to get the curds out and leave behind the whey. You can gently scoop it into another bowl using a slotted spoon, but depending on how big the slots are it can get a little tough towards the end.

Now, here is where we start to use modern technology to make this stuff happen fast (a trick I learned from SimpleBites). Take the bowl with the curds and stick it in the microwave for 60 seconds. Lots of whey will come out, so drain it off carefully. (I have no pictures of this part because I was busy trying to do things like drain off whey without dumping all the cheese on the floor). Fold it over to distribute the heat, then put it back in the microwave. Sprinkle with half a tsp of salt. Repeat this microwaving (not the adding of salt) until it starts to look like melted mozzarella (I had to do it more times than the original website did- don't despair, just keep going!). 

You should get to a point where you can stretch it a long way without breaking, when that happens, you're ready to make it into little balls! (or a big log, or whatever). Just roll it in your hands while it's still hot and melty.

Then of course you have the important dilemma of what to do with all this awesomeness.

We decided to make turkey slider patties (a current addiction) and grill a lot of veggies. We did peppers, onions, carrots, and zucchini, while they were hot they were tossed with garlic, olive oil, balsamic vinegar, and dry basil (fresh would have been awesome). 

 Then we cut the balls into little pieces (they were a little big) and tossed those in, and served it on a bed of baby spinach. So delicious!!

It would also be amazing on homemade pizza (like our bbq version!) or about a million other things... give it a shot!

Sunday, June 3, 2012

Fancy-schmancy Springtime Eggs- aka Brunch in 5 Minutes

Ok, in terms of cuteness vs. easiness, these eggs pretty much have all the odds in their favor. I saw them (of course) on Pinterest, and they originally came from Apron Strings. If you can get a 4 lobed pepper, they're not just cute, they look like little flowers! (and they'd be a lot cuter if I liked my eggs less cooked like the rest of the world seems to)

Anyhow... basically, here is your giant ingredient list, hold onto your hats!
Eggs
Bell peppers.

All you do here is slice the pepper into about 1/2 inch thick rings (through the widest part of the pepper). Heat up the pan on medium heat, spray with cooking spray or put in a little olive oil, put in the pepper, and crack the egg right into the pepper. A little egg will leak out, but it's easy to remove later.
You can flip them but you have to wait until the egg has cooked enough to stay together when you flip it. If you like runny eggs (which I don't) you could actually cook it on low until the egg seems solid and then serve as is! Use salt/pepper/chili sauce and whatever you normally would put on a fried egg.

Basically, it's not necessarily out of the ordinary in terms of taste, because it's still just a plain egg and bell pepper, but it definitely is an easy way to make eggs a little more special!

LinkWithin

Related Posts with Thumbnails